🤖 Automation connections
Not every request to a secret comes from a person. A deployment pipeline needs a database password; a scheduled job needs an API key. An automation connection lets such a workload use protected plans without a person's password being copied into it: you connect a trusted cloud identity and then say which plans that identity may use.
You find them under My Organisation → Automation connections (also as the Automation tab of Settings): "Connect a trusted cloud identity to protected plans."
Add a connection
Select Add connection. A two-step dialog opens: Create connection, then Verify identity.
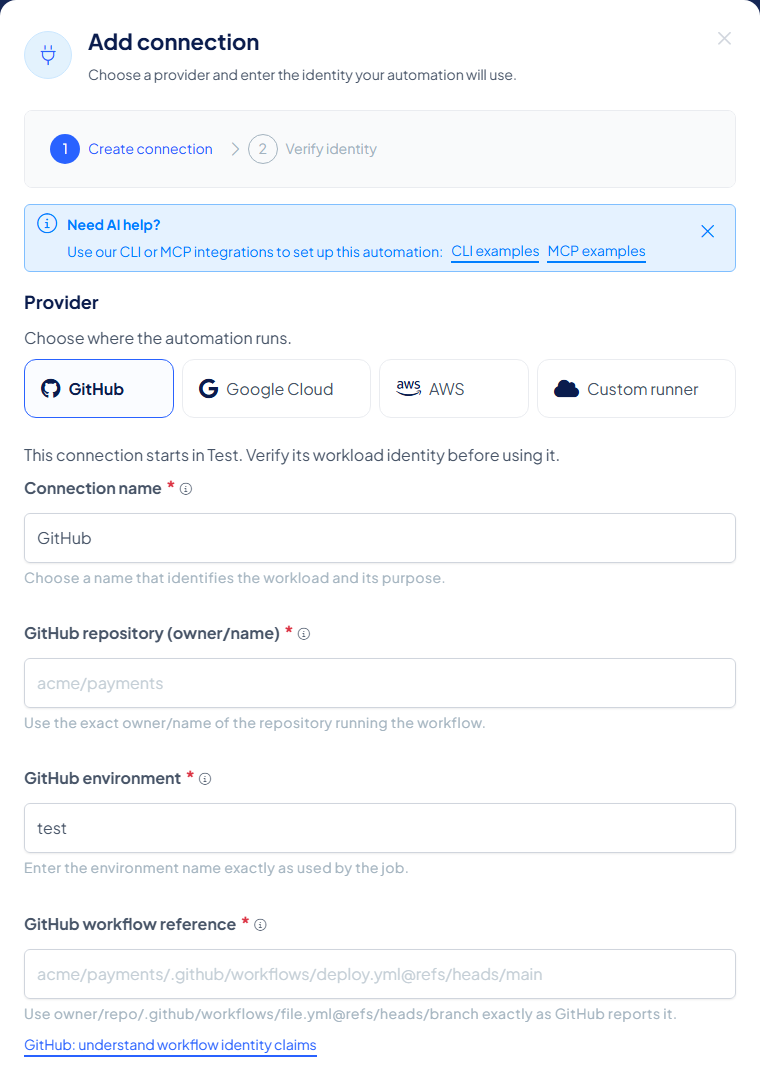
- Choose the provider, where your automation runs: GitHub, Google Cloud, AWS or a Custom runner.
- Give the connection a name your organisation will recognise when assigning plan access, for example GitHub deployment workflow.
- Describe the identity of the workload. For GitHub that is the repository (
owner/name), the environment the job uses and the workflow reference exactly as GitHub reports it (owner/repo/.github/workflows/file.yml@refs/heads/branch). For Google Cloud it is the service account attached to your Cloud Run service; for AWS the task role attached to your ECS service. - Select Create connection.
New connections start in Test: "Verify its workload identity before using it." Use Test while you set up and Live for production workloads.
Verify the identity
The second step shows the connection ID and the expected audience, with a Copy button each: the values your workload must be configured with. Until the workload has proven its identity, the connection's status reads Waiting for workload. Once it has, the dialog confirms "Identity verified" and the status becomes Verified.
Give a plan to a connection
A verified connection can use nothing until you assign it to a plan. Each plan has its own automation setup, Set up automation for this plan, which walks you through:
- Choose a connection: pick one of your organisation's connections, or create one on the spot.
- Verify its identity: prove the runner's identity before it can touch the plan.
- Assign plan access: choose the responsible member, review the grant and activate it.
- Run and review: run your automation, complete any steps the plan requires, then check the plan's Logs.
Only members who can edit the plan can manage its automation access, and your Organisation Key setup must be complete first.
For GitHub, the plan also offers Use this plan in GitHub Actions: choose the protected field the workflow may use, copy the generated workflow, then run it. The value stays protected until the request is approved in SafeKey Mobile, and the access shows up in the plan's logs.
Disable a connection
Select Disable connection on its card. The dialog warns that the connection "will no longer be available to automation jobs" and shows how many plan access assignments become unavailable. Select Disable to confirm, or Keep connection.
Good to know
- Statuses on the connection card are Waiting for workload, Verified and Disabled; the environment is Test or Live.
- Handy for set-up help: the dialog links to the CLI and MCP examples of the integrations.
- Every use of a plan by automation is recorded like any other access.